If you want to add security measures when using N4, you can use a Secure Socket Layer (SSL) certificate to create a secure HTTPS browser connection. This added security is often a requirement when exposing the ULC and JSP pages to external customers outside of the secure customer network.
Follow the steps below to enable SSL for N4:
|
1 |
Generate an SSL certificate (on page 1). |
|
2 |
Enable Tomcat to use the KeyStore file and enable SSL Connector (on page 1). |
|
3 |
Enable SSL/TLS on the Apache load balancer (on page 1). |
|
4 |
Configure N4 to only use the secure connection (on page 1). |
Step 1: Generate an SSL certificate
Using HTTPS requires an SSL certificate on your server which verifies the identity of the website for the client. On the server you use the Java keytool command to generate a Java KeyStore (JKS) file which contains the certificate information. This file needs to be created once and can be deployed to each of the N4 application nodes.
When you create the self-signed certificate, the identity on the private key is has not yet been verified by anyone else. A certificate signed by a third-party Certificate Authority (CA) is trusted by browsers, so the browser does not issue a warning when a user connects to the server.
To obtain a CA-signed certificate, you need to generate and submit a Certificate Signing Request (CSR) for your CA of choice (such as Thawte, Verisign, or other third-party CA). The CA verifies the credentials about a website and the identity of the website. Generally, the CAs charge a fee to sign a certificate. Then you retrieve the certificate from the CA and import it to the Java KeyStore (.jks) file.
A self-signed certificate is available for use immediately after you generate the certificate. However, a self-signed certificate is not trusted by the browser, so each time the user connects to the server, the browser displays warnings that the site hasn't been verified. Navis recommends that you use a CA-signed certificate instead of a self-signed certificate.
Risk of using self-signed certificates: If you are setting up the certificate on a cluster that's internal and not connected to the internet, you would need to advise users to click past the warnings. This can encourage unsafe browsing habits where they may start ignoring other warnings on public sites. For example, cyber-criminals use spoofed self-signed certificates to set up "man-in-the-middle attacks" in which they impersonate a website to obtain your login and passwords. These can be caught by heeding your browser warnings.
To generate an SSL certificate:
Create a self-signed certificate. From the command prompt, enter the following command:
keytool -genkey -alias ALIAS_NAME -keyalg RSA -keystore KEYSTORE_FILE.jks -keysize 1024
Enter the details for the publisher and a password for a keystore. Note the information for future reference.
Verify that the .keystore file is created in your current directory.
If you are obtaining a CA-signed certificate, create a certificate signing request (CSR) from your self-signed certificate.
keytool -certreq -alias ALIAS_NAME -keystore KEYSTORE_FILE.jks -file REQUEST_FILE.csr
Submit the CSR to a Certificate Authority of your choice.
Import the CA-signed certificate into the server's keystore, replacing the self-signed certificate.
keytool -import -trustcacerts -alias ALIAS_NAME -file CERTIFICATE_FILE.crt -keystore KEYSTORE_FILE.jks
The keystore file (.jks) is ready to be used.
Step 2: Enable Tomcat to use KeyStore file and enable SSL Connector
The KeyStore file must now be placed in the N4 tomcat folder, and the configuration for connections must be edited to use the KeyStore file and HTTPS protocol. This process much then be repeated for every node.
As the configurations below may change over time, please refer to the latest Tomcat documentation (https://tomcat.apache.org/tomcat-8.0-doc/ssl-howto.html).
To enable the SSL connection:
On the N4 node, locate the server.xml file (default location: C:\ProgramData\Navis\cluster\conf\server.xml) and open the file in a text editor.
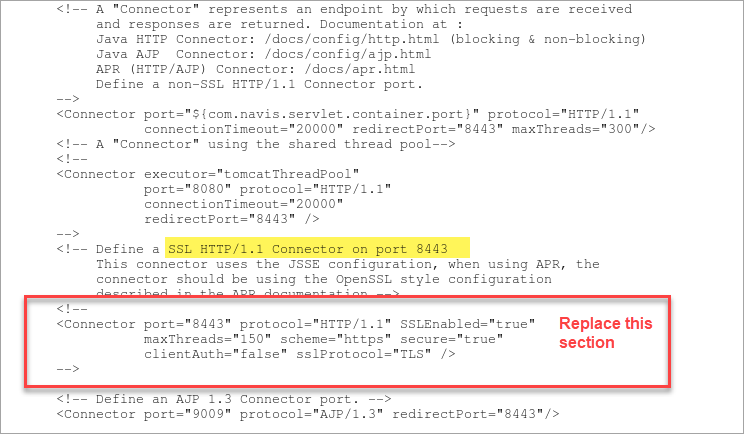
Locate the section that defines SSL HTTP/1.1 Connector on port 8443:
Replace the section in red (above) with the following:
<Connector port="8443"
maxThreads="150"
minSpareThreads="25"
maxSpareThreads="75"
enableLookups="true"
disableUploadTimeout="true"
acceptCount="100"
debug="0"
scheme="https"
secure="true"
clientAuth="false"
keystoreFile="PATH/KEYSTORE_FILE"
keystorePass="PASSWORD"
SSLEnabled="true"
sslEnabledProtocols="TLSv1.2"
useServerCipherSuitesOrder="true"
ciphers="TLS_ECDHE_ECDSA_WITH_AES_256_CBC_SHA384,
TLS_ECDHE_RSA_WITH_AES_256_CBC_SHA384,
TLS_ECDH_ECDSA_WITH_AES_256_CBC_SHA384,
TLS_ECDH_RSA_WITH_AES_256_CBC_SHA384,
TLS_DHE_DSS_WITH_AES_256_CBC_SHA256,
TLS_ECDHE_ECDSA_WITH_AES_256_CBC_SHA,
TLS_ECDHE_RSA_WITH_AES_256_CBC_SHA,
TLS_ECDH_ECDSA_WITH_AES_256_CBC_SHA,
TLS_ECDH_RSA_WITH_AES_256_CBC_SHA,
TLS_DHE_DSS_WITH_AES_256_CBC_SHA,
TLS_ECDHE_ECDSA_WITH_AES_128_CBC_SHA256,
TLS_ECDHE_RSA_WITH_AES_128_CBC_SHA256,
TLS_ECDH_ECDSA_WITH_AES_128_CBC_SHA256,
TLS_ECDH_RSA_WITH_AES_128_CBC_SHA256,
TLS_DHE_DSS_WITH_AES_128_CBC_SHA256,
TLS_ECDHE_ECDSA_WITH_AES_128_CBC_SHA,
TLS_ECDHE_RSA_WITH_AES_128_CBC_SHA,
TLS_ECDH_ECDSA_WITH_AES_128_CBC_SHA,
TLS_ECDH_RSA_WITH_AES_128_CBC_SHA,
TLS_DHE_DSS_WITH_AES_128_CBC_SHA,
TLS_ECDHE_ECDSA_WITH_RC4_128_SHA,
TLS_ECDH_ECDSA_WITH_RC4_128_SHA,
TLS_ECDH_RSA_WITH_RC4_128_SHA,
TLS_ECDHE_ECDSA_WITH_AES_256_GCM_SHA384,
TLS_ECDHE_ECDSA_WITH_AES_128_GCM_SHA256,
TLS_ECDHE_RSA_WITH_AES_256_GCM_SHA384,
TLS_RSA_WITH_AES_256_GCM_SHA384,
TLS_ECDH_ECDSA_WITH_AES_256_GCM_SHA384,
TLS_ECDH_RSA_WITH_AES_256_GCM_SHA384,
TLS_DHE_DSS_WITH_AES_256_GCM_SHA384,
TLS_ECDHE_RSA_WITH_AES_128_GCM_SHA256,
TLS_RSA_WITH_AES_128_GCM_SHA256,
TLS_ECDH_ECDSA_WITH_AES_128_GCM_SHA256,
TLS_ECDH_RSA_WITH_AES_128_GCM_SHA256,
TLS_DHE_DSS_WITH_AES_128_GCM_SHA256,
TLS_ECDHE_ECDSA_WITH_3DES_EDE_CBC_SHA,
TLS_ECDHE_RSA_WITH_3DES_EDE_CBC_SHA,
TLS_ECDH_ECDSA_WITH_3DES_EDE_CBC_SHA,
TLS_ECDH_RSA_WITH_3DES_EDE_CBC_SHA,
TLS_EMPTY_RENEGOTIATION_INFO_SCSVF
"/>
Update the KeyStore information including the path and password for the .keystore file:
keystoreFile="PATH/KEYSTORE_FILE"
keystorePass="PASSWORD"
Save and close the server.xml file.
Start the N4 service.
The SSL connection is now configured and may be tested. N4 will now be available at port 8443, so update the port number when you launch N4 from the client:
https://<serveraddress>:8443/apex/
Step 3: Enable SSL/TLS on the Apache load balancer
In addition to configuring SSL/TLS on the Tomcat nodes, you should also configure SSL/TLS on your load balancer server. The Apache HTTP Server module mod_ssl provides an interface to the OpenSSL library, which provides Strong Encryption using the SSL and TLS protocols. You can set up the Apache load balancer with SSL/TLS according to instructions provided by the Apache website (http://httpd.apache.org/docs/2.4/ssl/). (Navis is not responsible for the accuracy of the instructions, or the veracity of the execution.)
Navis recommends that you disable medium strength ciphers as well as disable the HTTP TRACE method if you are not using it. The HTTP TRACE method is typically used for debugging. (On the N4 Tomcat node, HTTP TRACE is disabled by default.)
To configure SSL/TLS for the load balancer:
Make sure you have generated the SSL certificate file (.crt) and the SSL certificate key file (.key) using OpenSSL which is documented in the Apache website (http://httpd.apache.org/docs/2.4/ssl/).
On the load balancer, open the httpd.conf file with a text editor.
Enable SSL/TLS httpd with the following configuration:
#Turn on SSL/TLS
SSLEngine on
SSLCertificateFile C:/Apache24/conf/ssl/server.crt
SSLCertificateKeyFile C:/Apache24/conf/ssl/server.key
# Support only selective/strong ciphers. This setting disables SSLv3, TLSv1, TLSv1.1.
SSLProtocol all -SSLv3 -TLSv1 -TLSv1.1
SSLCipherSuite
ECDHE-ECDSA-AES256-GCM-SHA384:ECDHE-RSA-AES256-GCM-SHA384:ECDHE-ECDSA-CHACHA20-POLY1305:ECDHE-RSA-CHACHA20-POLY1305:ECDHE-ECDSA-AES128-GCM-SHA256:ECDHE-RSA-AES128-GCM-SHA256:ECDHE-ECDSA-AES256-SHA384:ECDHE-RSA-AES256-SHA384:ECDHE-ECDSA-AES128-SHA256:ECDHE-RSA-AES128-SHA256
SSLHonorCipherOrder on
SSLCompression off
SSLSessionTickets off
At the end of the httpd.conf file, add the following line to disable HTTP TRACE method:
TraceEnable Off
Save and close the file.
Verify that the TRACE method is actually disabled using the curl command:
curl --insecure -v -X TRACE https://<host IP address>/apex
You should see a message that says "The requested method TRACE is not allowed for the URL /apex."
Step 4: Configure N4 to only use the secure connection
This final step is optional to disable HTTP access and only allow HTTPS connections. It is most likely not required for internal customer sessions. Furthermore some third-party middle ware and interfaces may not be configurable to utilize the secure connection and therefore will still require the use of the HTTP protocol.
To use only HTTPS connections to N4:
Navigate to the web.xml file (default location C:\Program Files\Navis\sparcsn4\webapps\apex\WEB-INF).
Open web.xml in a text editor.
Before the end of the file just before </web-app> add the following XML code:
<security-constraint>
<web-resource-collection>
<web-resource-name>securedapp</web-resource-name>
<url-pattern>/*</url-pattern>
</web-resource-collection>
<user-data-constraint>
<transport-guarantee>CONFIDENTIAL</transport-guarantee>
</user-data-constraint>
</security-constraint>
The URL pattern is set to make available all resources of the application. This can be further restricted if required (for example to disallow access to debug folders that may be deployed).
Save and close the file.