To facilitate transitions from the Navis legacy product, SPARCS, or from XPS Test systems to Live Production systems, Navis has added features that allow customers to select XPS- or SPARCS 3.x -owned data to export, and then import it into to an N4 system through an upgraded XPS client. This helps you to avoid having to manually enter the preexisting legacy system's data to an N4 system. For example, allocation ranges, CHE names, User names, etc.
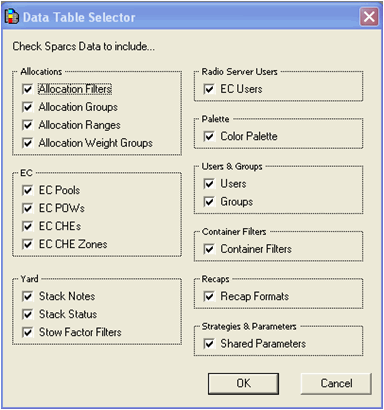
Data elements that are manually created by users in the SPARCS 3.x interface, and that XPS also uses, are available for Export/Import. These are:
Allocations (including Allocation Filters, Allocation Groups, Allocation Ranges, and Allocation Weight Groups)
EC (including EC Pools, EC POWs, EC CHEs, EC CHE Zones)
Yard (including Stack Notes, Stack Status, Stow Factor Filters)
Radio Server Users (EC Users)
Palette (Color Palette)
Users and Groups (Users, Groups)
Container Filters (Container Filters)
Recaps (Recap Formats)
Strategies & Parameters (Shared Parameters)
N4 has an existing SNX import tool for importing reference and working data from Express and SPARCS 3.x that in an N4 system is created on, or owned by, the N4 client. You use the SNX import tool to import data such as units, vessels, bookings, bills of lading, containers, chassis, accessories, and bundles. For some of this data, you can also use EDI. Please see Post-installation setup for N4 (on page 1) in the Navis N4: Setup, Maintenance, and System Diagnostics Guide for information about SNX.
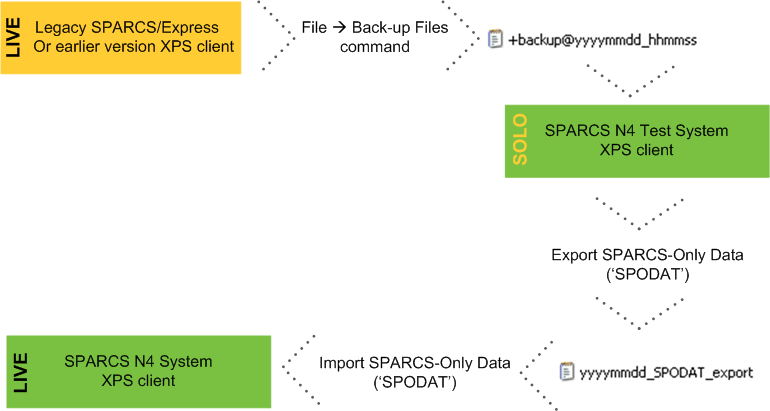
To convert data from a legacy SPARCS or test system for XPS:
Take a File  Back-up Files from the 3.x SPARCS system or XPS test system. In both SPARCS 3.x systems and XPS systems, this action saves data to the Private data folder for the client.
Select Help About Navis SPARCS. The path to the Private folder appears in the splash screen.
Using the backup as the data source, start up an XPS client in solo mode. Log in as a user in a group that has the 'SPODAT' privilege set to 'ON'.
See the Navis N4: Reference Guide for more information about this privilege. For instructions about how to start an XPS client using a backup data source, see Start a solo XPS client using a backup data source.
To reduce chances of error, Navis recommends only turning the 'SPODAT (on page 1)' privilege to 'ON' when you are ready to export.
Upon starting up in solo mode with the backup data file, you may receive warnings that some of the data is not a good match. If you receive these warnings, it is acceptable to say 'YES' to delete the data that is not matching. This is because any mismatches are likely due to the differences between SPARCS 3.x and XPS.
Choose File Export SPARCS-Only Data..., and from the dialog box, select data tables to export, and save the .txt file to a location of your choice.
Some of the data tables are inter-dependent; some subsets may not make sense. Regardless, upon import, XPS knows what order to add any combination so that they maintain their dependencies.
Quit solo mode, and open XPS as a client of the upgraded test or production system. Again, log in as a user in a group that has the 'SPODAT' privilege set to 'ON'.
Choose File Import SPARCS-Only Data... to select the file you saved upon export. The system populates the reference data into all relevant locations in N4.
You can manually edit the text file as needed.
If you import multiple times, XPS overwrites exact name matches.
In the XPS client, check in the relevant dialogs for duplicates or other errors.
To reduce chances of error, Navis recommends turning the 'SPODAT' privilege to 'OFF' as soon as it is no longer needed for import.